

Table of Contents
- What You'll Need Before Your First Session
- TENS vs EMS for Muscle Recovery
- Best Electrode Placement for Recovery
- How Long to Use EMS for Muscle Recovery
- Setting Intensity and Stimulation Programs
- Safety Precautions and Contraindications
- Troubleshooting Common Stimulation Issues
- Tracking Recovery Progress and Combining Modalities
- Frequently Asked Questions
Last Updated: October 4, 2026
What You'll Need Before Your First Session
Portable muscle stimulators are small battery-powered devices that send gentle electrical pulses through electrode pads to trigger muscle contractions or ease soreness. This guide from TresAdore walks through how to use portable muscle stimulators for recovery, from setup to session length.
Before your first session, gather a few basics:
- The stimulator unit, fully charged
- Two or four fresh electrode pads
- Conductive gel or a damp cloth if pads feel dry
- A clean, dry towel
- A timer or your phone
Skin prep matters more than most people think. Oils, lotion, and sweat block current from reaching the muscle, so wipe the area with soap and water and let it dry fully.
TENS vs EMS for Muscle Recovery
TENS and EMS use the same hardware but do different jobs. TENS targets nerve endings to dull pain signals. EMS targets the muscle itself to create visible contractions and support blood flow.
For recovery, the difference is simple:
- TENS is best for soreness and nagging aches after a hard day.
- EMS is best for flushing out stiffness and re-engaging tired muscles.
Many portable units offer both modes on one dial. Check the label before you start, because the pulse patterns feel completely different. According to the FDA guidance on powered muscle stimulators, these devices are cleared for muscle re-education and pain relief, not for treating medical conditions.
Best Electrode Placement for Recovery
Good electrode placement is the difference between a session that helps and one that just tingles. The goal is to drive current through the muscle belly, the thickest, most contractile part of the muscle, and across its motor point, the spot where the nerve enters the muscle and where the contraction is easiest to trigger.
Place pads along the length of the muscle, not across it. If you lay pads side-by-side across a quad, current travels sideways through skin and fat and you feel a surface tingle with no real contraction.
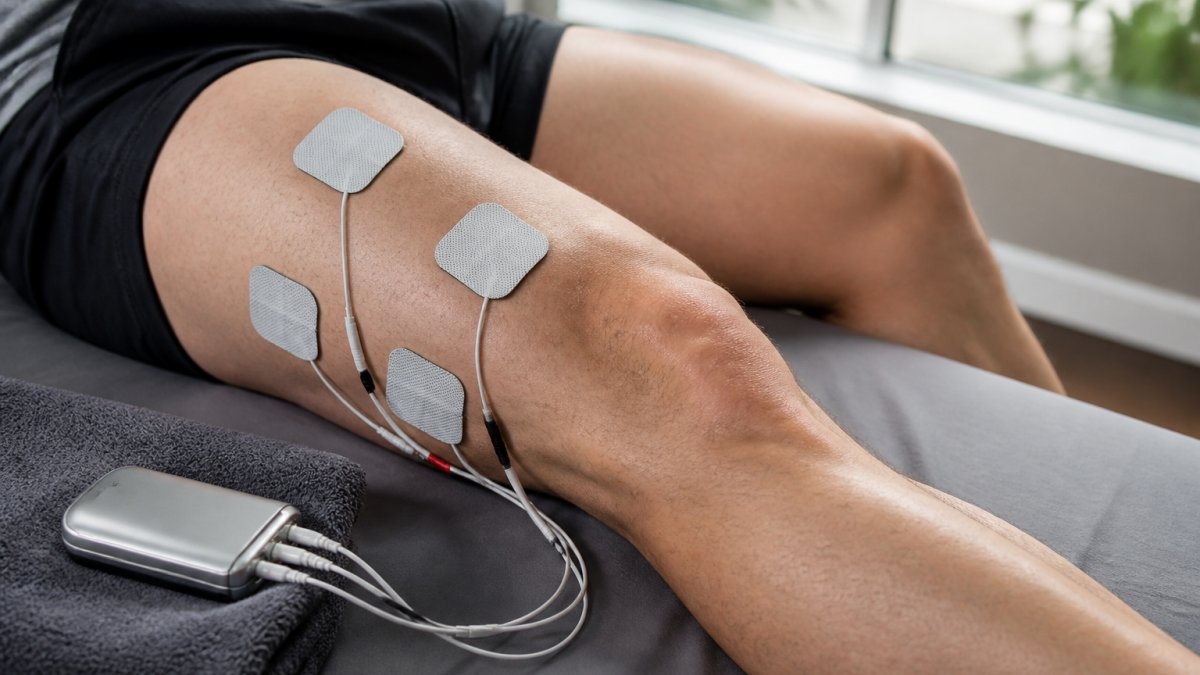
Keep pads at least two inches apart and never let them touch, touching pads short-circuit the current and you feel nothing. Wipe the skin first, then press each pad flat for a full five seconds.
Placement by Muscle Group
- Quads: one pad two to three inches above the knee, one high on the thigh near the hip crease. This runs current along the rectus femoris and hits the motor point on the upper thigh.
- Hamstrings: one pad just below the glute fold, one just above the back of the knee. Keep both pads on the back of the leg, never wrapping to the front.
- Calves: one pad below the knee on the meat of the calf, one above the ankle. Avoid the Achilles tendon, it has little muscle to contract and stimulation there feels sharp.
- Arms (biceps/triceps): one pad near the shoulder attachment, one near the elbow. For forearms, use smaller pads and shorten the session.
- Lower back: one pad on each side of the spine, roughly two inches out from the vertebrae. Never place a pad directly on the spine, you want the erector spinae muscles flanking it, not the bony column.
- Glutes: one pad on the upper outer quadrant, one on the lower outer quadrant. Keep pads off the tailbone.
Pad Spacing and Current Path
Spacing controls how deep the current reaches. Pads close together keep current shallow and you feel a prickle. Pads farther apart (up to about four to six inches on large muscles) push current deeper through the muscle belly. If a session feels sharp or surface-level, widen the spacing before you raise intensity.
Placement Mistakes That Kill a Session
- Pads on bone or joint: the knee, elbow, shin bone, and spine have no muscle to contract. Move pads onto the muscle belly.
- Pads over a tattoo or scar: ink and scar tissue change conductivity and can cause hot spots. Shift placement a half-inch to clear skin.
- Pads on hairy or lotioned skin: hair lifts the adhesive and lotion blocks current. Trim if needed and always wipe with soap and water.
- Reusing a pad that has lost its tack: a curling corner means uneven current. Replace it, do not tape it down.
How Long to Use EMS for Muscle Recovery
A typical EMS recovery session runs 15 to 20 minutes per muscle group. Start with 10 minutes for your first few sessions and build up as your muscles adjust.
Longer is not better here. Overuse can leave a muscle feeling tired instead of refreshed. Aim for:
- 10 minutes for small muscles like forearms
- 15 minutes for calves and arms
- 20 minutes for large muscles like quads and back
Wait at least four hours before treating the same muscle group again.
Setting Intensity and Stimulation Programs
Set intensity by feel, not by the number on the screen. Turn it up until you see a clear muscle contraction, then back off one notch. It should feel strong but never painful. The number on the display is arbitrary across brands, a 12 on one unit can feel like a 6 on another, so the contraction itself is your only reliable gauge.
What the Settings Actually Control
Three settings shape every session, and most portable units hide them behind preset names:
- Pulse width (measured in microseconds, µs): how long each pulse lasts. Wider pulses recruit more muscle fibers and feel deeper. Recovery programs typically sit in the 200-400 µs range; narrower pulses feel more like a surface tingle.
- Frequency (measured in Hz): how many pulses per second. Low frequencies (around 2-10 Hz) produce visible twitches and are common in recovery and massage programs. Higher frequencies (35-80 Hz) produce a smooth, sustained contraction used for strength and re-education.
- Ramp time: how quickly the unit builds to full intensity at the start of a contraction. A longer ramp (two to three seconds) feels smoother and is easier on a sore muscle.
For post-workout recovery, choose the recovery or massage-style program with a slower pulse and lower frequency. If your unit lets you set parameters manually, a reasonable starting point is 2-10 Hz with a 250-350 µs pulse width and a two-second ramp.
LED red light physiotherapy panel with infrared light for deep relief of muscle →
A Four-Week Progression
Most people jump straight to the highest setting and wonder why the muscle feels wrecked the next day. A gradual build works better:
- Week 1: 10 minutes per muscle group, intensity just below a visible contraction. Goal is tolerance, not output.
- Week 2: 12-15 minutes, intensity at a clear but comfortable contraction. Add one muscle group you skipped in week 1.
- Week 3: 15-20 minutes on large muscles, 10-12 on small ones. Introduce a second weekly session per muscle group, spaced at least 48 hours apart.
- Week 4 and beyond: hold at 15-20 minutes and adjust intensity session to session based on how the muscle feels that day.
Reading Your Body's Signals
- Clean, even contraction: intensity is right.
- Flickering or jerky contraction: pads are lifting or intensity is too high. Press pads flat, then drop one notch.
- Sharp sting or burn: poor contact or dry pads. Add conductive gel or replace pads before touching intensity.
- No sensation at all: check the battery and pad adhesion before assuming the unit is broken.
Pairing Stimulation With Other Recovery Tools
Stimulation works best as one piece of a routine, not the whole routine. A practical sequence after a hard session:
- Light movement (5-10 minutes): walk or cycle easy to bring blood flow up before you stimulate.
- EMS session (15-20 minutes): run the recovery program on the target muscle group.
- Foam rolling or stretching (5-10 minutes): use the muscle while it is warm and relaxed to work out remaining tightness.
- Hydration and sleep: the actual repair happens here, not on the couch with the pads on.
Some people also add red light therapy after stimulation to support blood flow and ease muscle tension. At TresAdore, we carry recovery tools that fit this routine, including our LED red light physiotherapy panel with infrared light. Use it after a stim session to help muscles relax.

Safety Precautions and Contraindications
Skip stimulation and talk to a doctor first if you have a pacemaker, an implanted defibrillator, or a heart condition. Do not place pads on the front of the neck, over the head, across the chest, or on broken skin.
Other rules to follow:
- Never use a stimulator while driving or in water.
- Keep pads away from the eyes and mouth.
- Stop if you notice a rash or lasting redness.
- Do not use on numb areas where you cannot feel the current.
The FDA consumer update on TENS units notes that these devices are not for everyone and should be used only as directed.
Troubleshooting Common Stimulation Issues
Weak or uneven sessions usually trace back to the pads, not the device. Here is how to fix the most common problems:
| Problem | Likely Cause | Fix |
|---|---|---|
| No sensation | Dead battery or loose pad | Charge unit, press pads flat |
| Tingling but no contraction | Intensity too low | Raise one notch at a time |
| Sharp sting | Dry pads or poor contact | Add gel, replace pads |
| Uneven pulses | Pads too close together | Space pads two inches apart |
| Skin irritation | Worn adhesive or long session | Swap pads, shorten session |
Electrode pads wear out after 10 to 20 uses. When they stop sticking, replace them. Old pads are the most overlooked cause of a "broken" stimulator.
Tracking Recovery Progress and Combining Modalities
Track how you feel, not just how the session felt. Log soreness on a simple 1-to-10 scale before and after each session, plus how your muscles feel the next morning. A downward trend over a week tells you more than any single session.
Pair stimulation with other recovery tools for better results. Light movement, hydration, and sleep all help clear metabolic waste. Many people also add red light therapy after stimulation to support blood flow and ease muscle tension.

At TresAdore, we carry recovery tools that fit this routine, including our LED red light physiotherapy panel with infrared light. Use it after a stim session to help muscles relax.
Frequently Asked Questions
Do portable muscle stimulators actually help with recovery?
Yes, when used correctly. EMS units trigger muscle contractions that support blood flow circulation and metabolic waste removal, which can ease delayed onset muscle soreness. They work best as one part of a broader recovery protocol that includes sleep, hydration, and active recovery. Results depend on consistent use and proper electrode placement, so follow the session timing and intensity guidance in your device manual.
What is the difference between TENS and EMS for recovery?
TENS targets nerve stimulation to reduce pain signals, while EMS targets motor unit recruitment to create visible muscle contractions. For post-exercise recovery, EMS is the better fit because it engages muscle fiber activation directly. Many portable units offer both modes, so check your device settings before choosing a program. If you want pain relief rather than muscle activation, switch to TENS mode.
How long should a muscle stimulation recovery session last?
Most recovery protocols run 15 to 30 minutes per muscle group, with sessions spaced several hours apart. Start at the lower end and increase only if you feel no muscle tension or discomfort the next day. Longer sessions do not speed recovery and can cause muscle fatigue. Your device manual will list the exact range for each stimulation program.
Are there safety precautions when using portable muscle stimulators?
Avoid placing electrode pads over the heart, neck front, head, or broken skin. Do not use a stimulator if you have a pacemaker, are pregnant, or have a diagnosed heart condition without clearing it with a physician first. Keep intensity below your pain threshold and stop if you notice skin irritation. Proper conductive gel and clean electrode pads also protect dermatological safety.
Recovery works best when your tools are simple and your routine is steady. If you want gear that supports that habit, TresAdore offers a curated mix of wellness tech and everyday pieces, from our red light therapy blanket to our portable red light therapy device. Explore the collection and build a recovery setup that fits your life.


